I have had a foam roller since my late twenties. It helped. But there are spots on your body that a foam roller just cannot reach with enough concentrated pressure to actually break something loose. A foam roller spreads the load. A lacrosse ball focuses it. I started keeping a pair of Kieba lacrosse balls in my gym bag about two years ago, and there are now ten spots I hit on a regular basis that have genuinely changed how I feel the day after a hard session. These are not obscure physical-therapy techniques. They are the spots every athlete I know has complained about at some point. The ball just gives you a way to do something about them.
The Kieba set costs less than a single sports massage appointment and travels in a gym bag pocket.
Two firm balls, consistent shape, and enough density to actually sink into knotted tissue. If you are going to work any of the spots below, start with the right tool.
Amazon Check Today's Price on Amazon →Plantar Fascia (The Arch of Your Foot)
Stand near a wall for balance and place the ball under the arch of one foot. Apply about 60 percent of your body weight and make slow, deliberate forward-and-back passes. Spend 90 seconds per foot, pausing on any spot that makes you involuntarily exhale. If you are a runner or you spend eight hours on hard floors, this one will feel almost unfairly good. The plantar fascia tightens from repeated impact and almost never gets any direct attention. The ball gives you a way to actually depress the tissue rather than just stretch it.
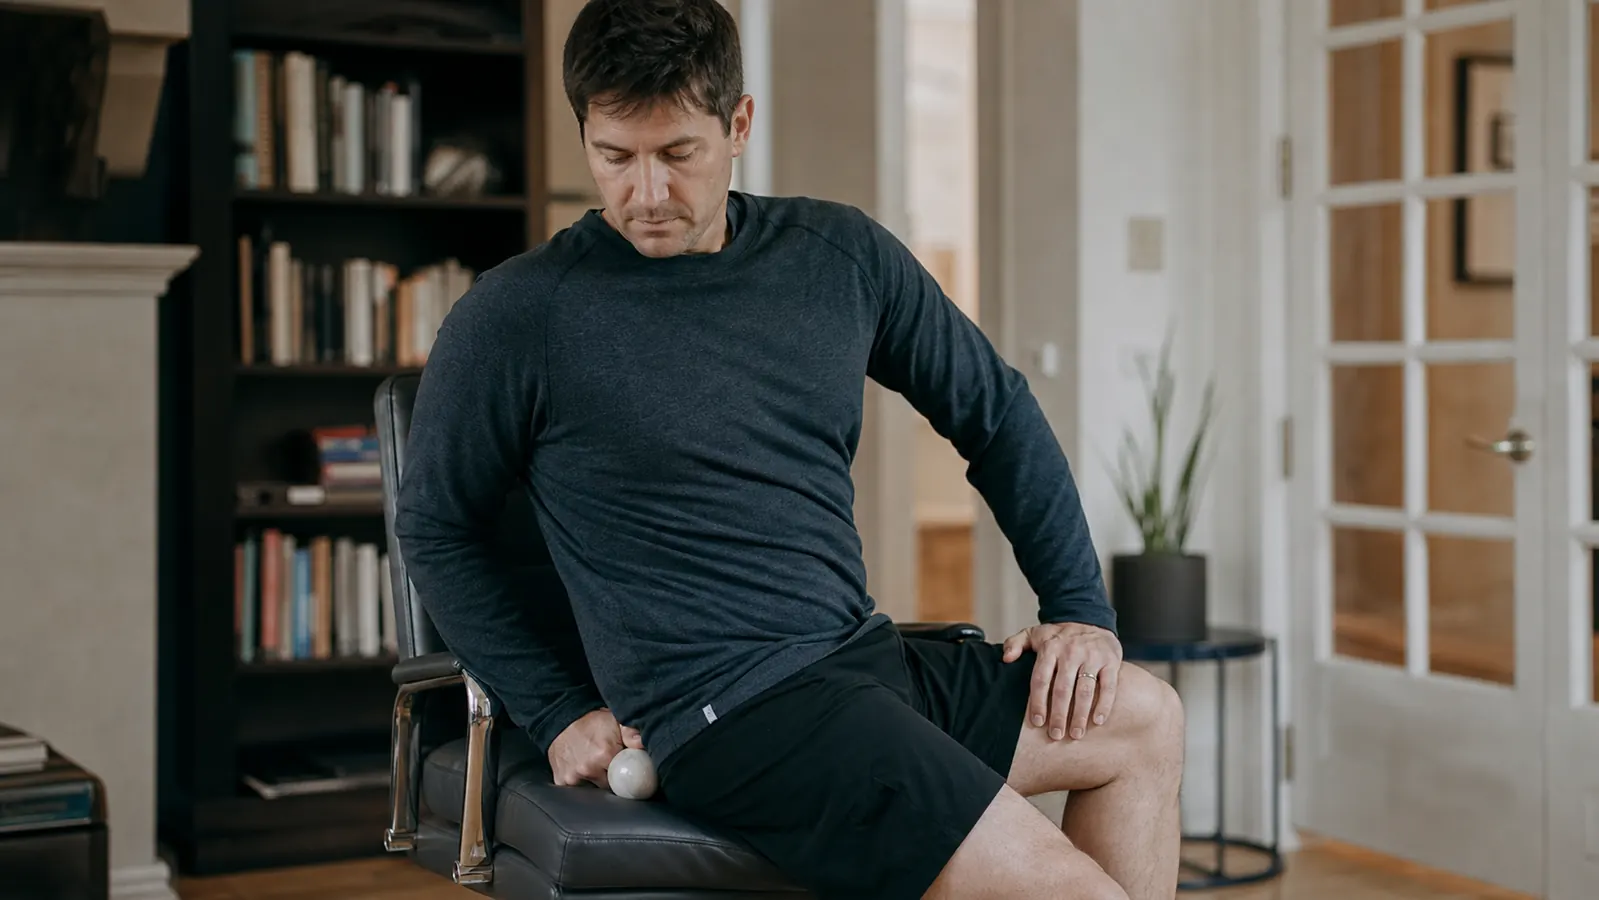
Glutes (Mid-Gluteus and Piriformis)
Sit on the floor or on the edge of a bench with the ball under one glute. Cross the ankle of that side over the opposite knee to externally rotate the hip, which pulls the piriformis taut. Then lean gently until the ball sinks into the meatiest part of the glute. Hold for 30 to 45 seconds, then inch the ball around to find adjacent knots. Tight glutes refer pain to the lower back and restrict hip hinge mechanics. If your deadlift has felt off, start here before blaming your hamstrings.
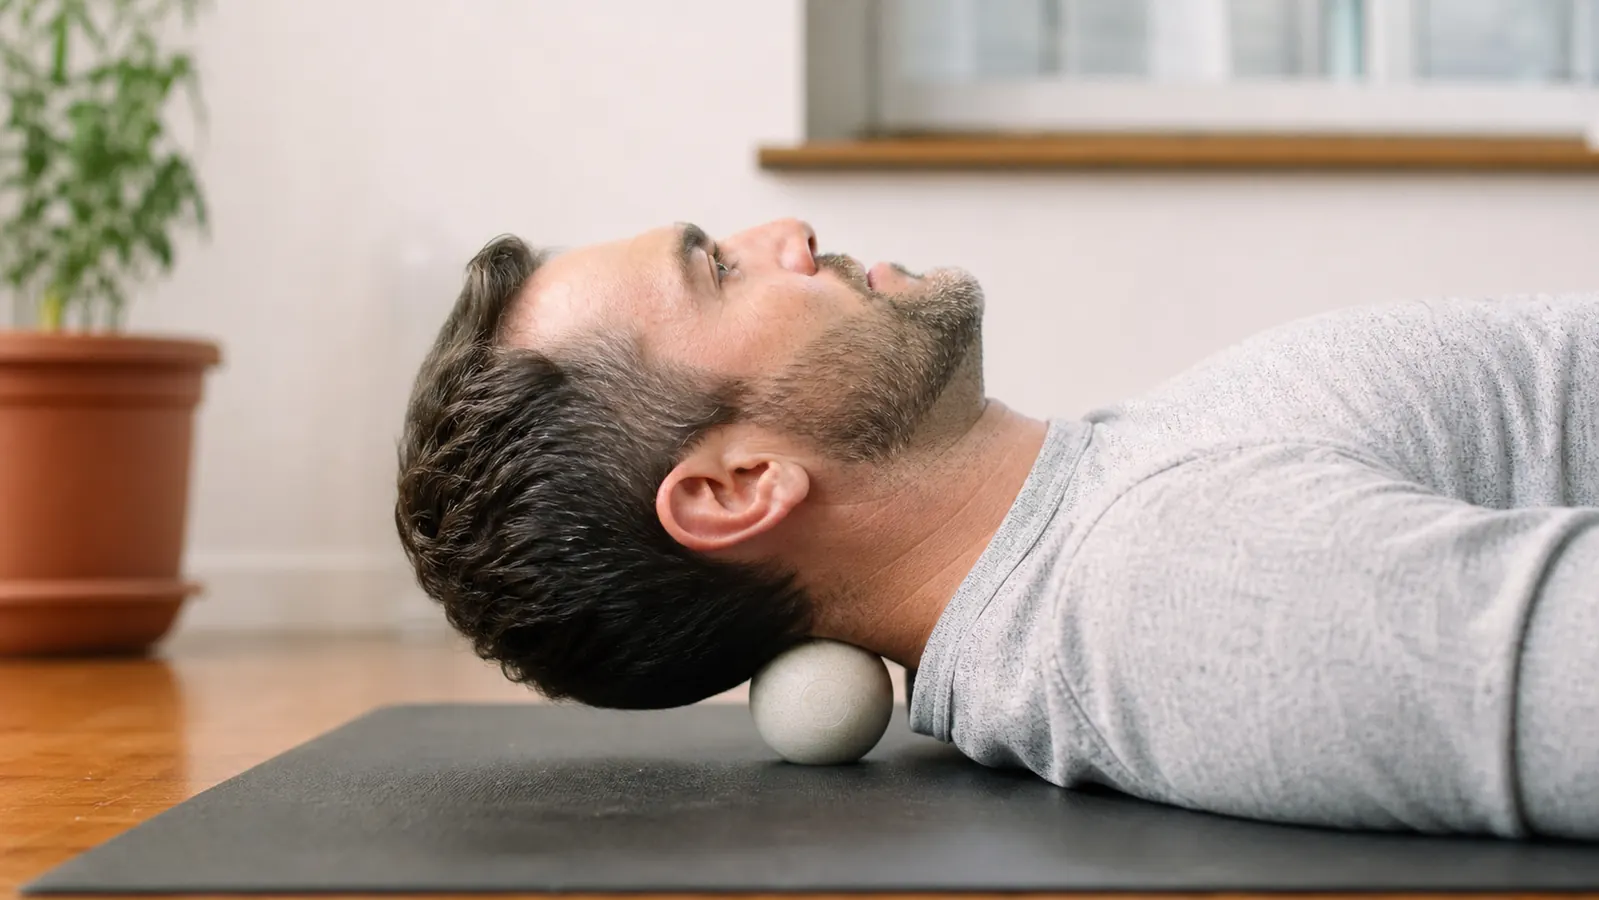
Upper Traps (The Shoulder-Neck Junction)
Lie on your back and place the ball between the top of your shoulder and the base of your neck. Let gravity do the work rather than pressing hard. Breathe slowly and give the tissue 60 to 90 seconds to respond. This is the spot that accumulates tension from overhead pressing, carrying anything heavy, and the hours most of us spend hunched at a desk or a steering wheel. Foam rollers cannot get close to this area without rolling onto the spine. The ball lands exactly where you need it.
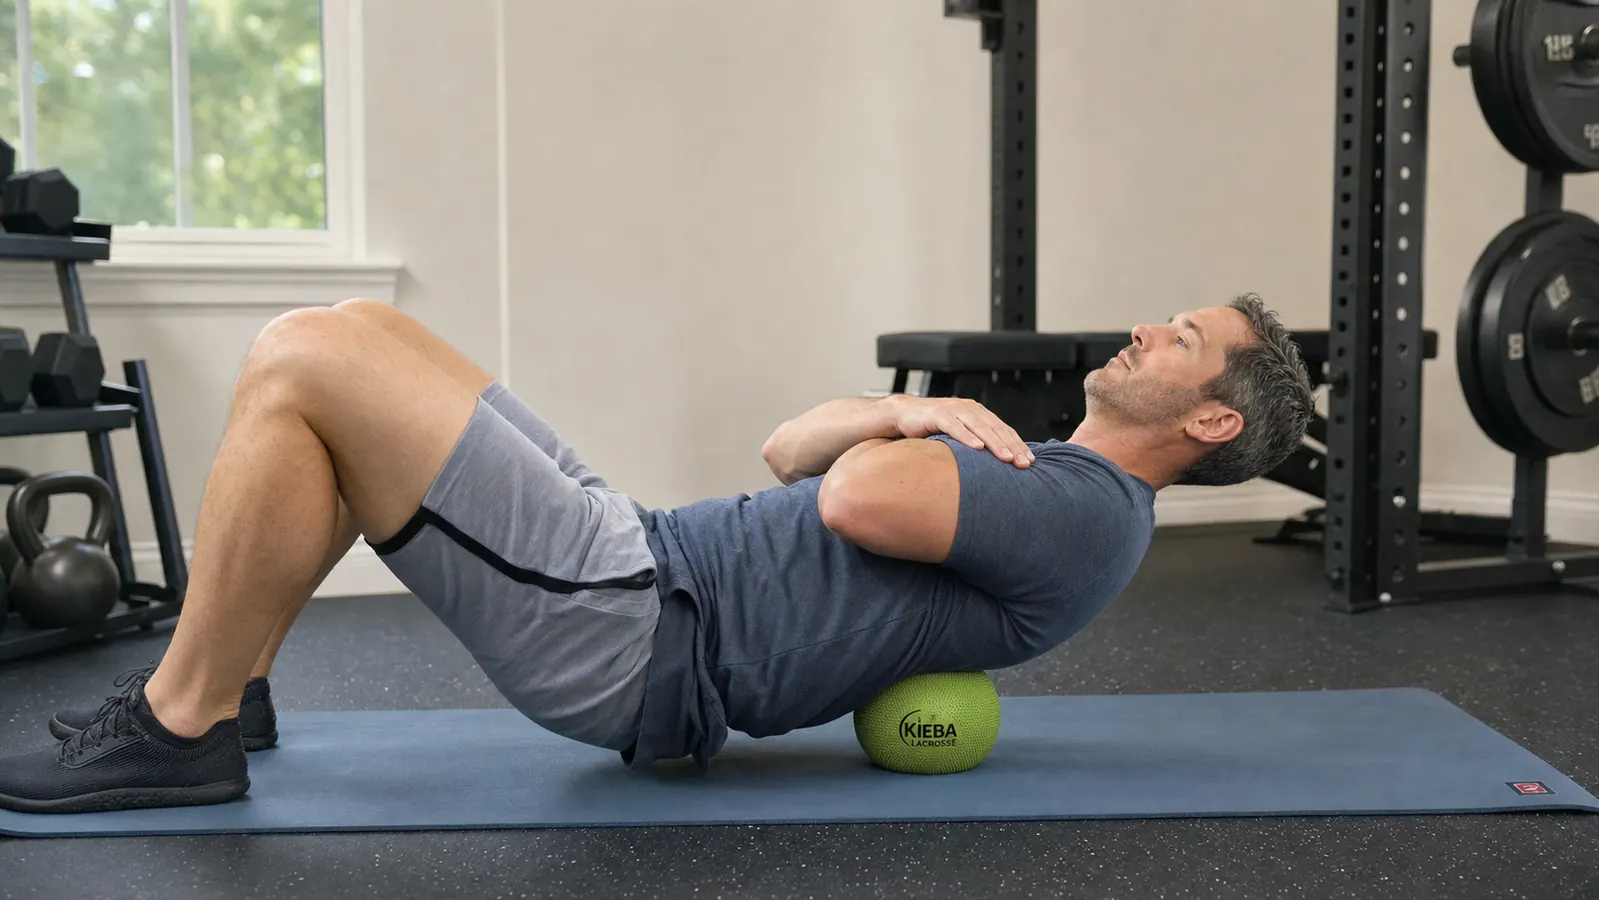
Thoracic Spine (Mid-Back Mobility Work)
Use both balls here if you have a pair. Place one on each side of your thoracic spine, not on the spine itself. Lie back over them so they land on the paraspinal muscles about an inch out from the vertebrae. Extend slightly over the balls, hold for 30 seconds, then shift one vertebral level up. Work from the bottom of your shoulder blades up to the base of your neck. This is the technique that keeps overhead squats and presses from destroying your lower back by actually restoring thoracic extension instead of just stretching around the restriction.
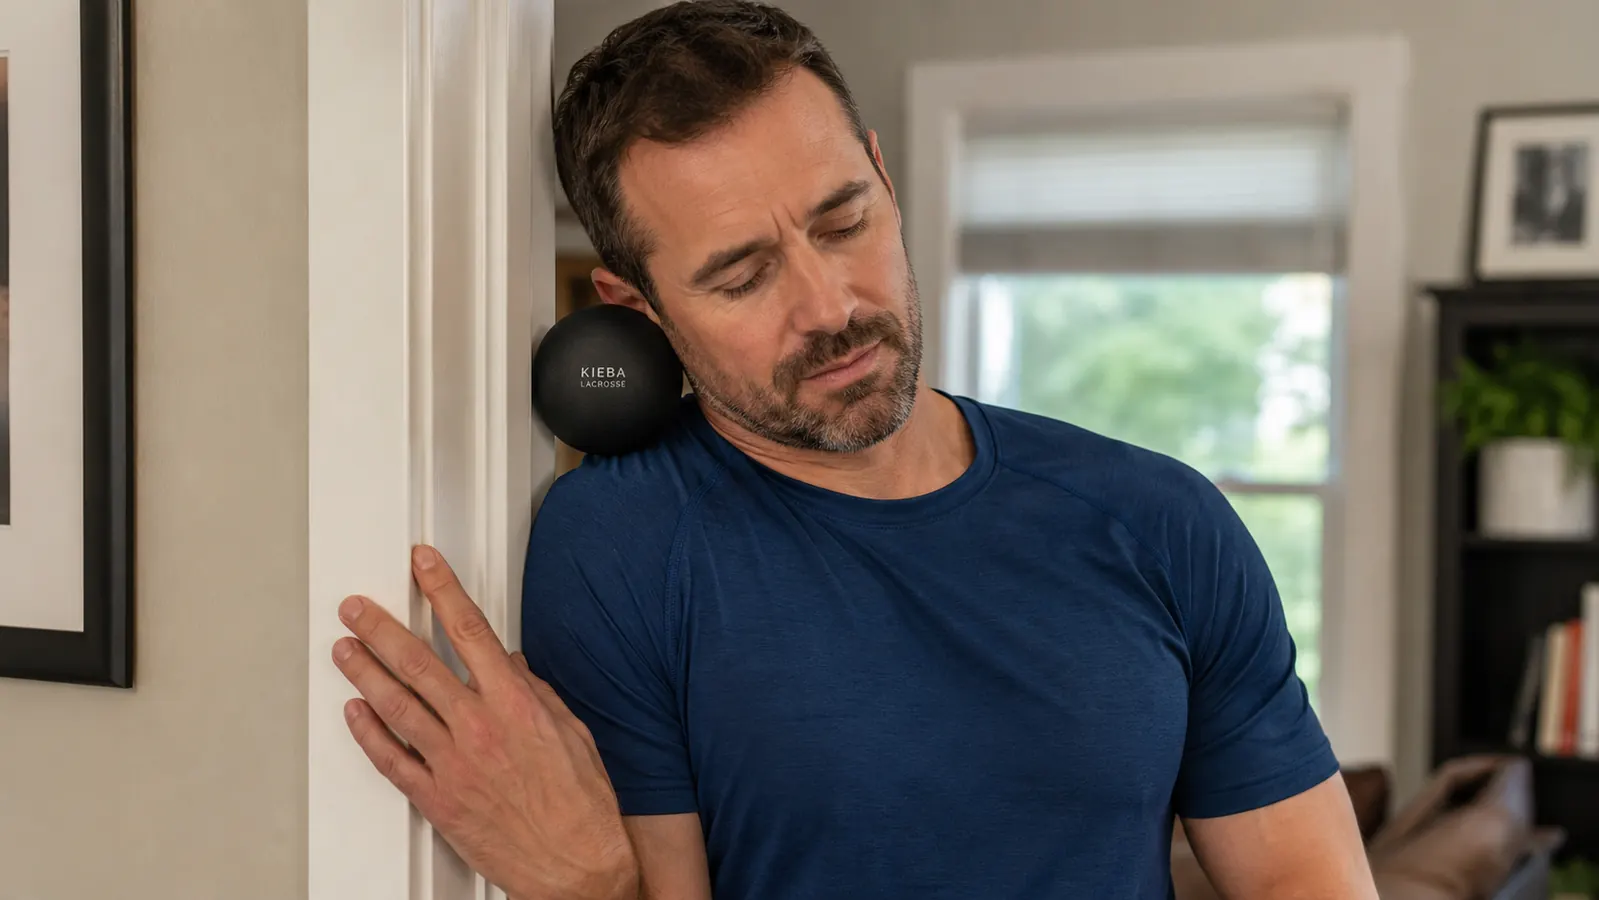
Pec Minor (The Hidden Chest Knot)
Stand facing a wall and place the ball between your chest and the wall, just below the collarbone and inside the shoulder. Lean in gently and slowly rotate your arm down and then back up. You are looking for a spot that refers discomfort down into your arm or creates that familiar tightness you feel when you try to open up your chest. Pec minor restricts shoulder movement and forces your neck and upper trap to compensate. Bench pressers and anyone who types for a living will find this spot almost immediately.
Hip Flexors (TFL and Upper Quad Attachment)
Lie face down and place the ball just below your hip bone, in the soft tissue between the hip and the front of the thigh. Let your weight sink slowly into the ball rather than pressing down with your hands. Breathe out and try to relax the leg completely. Hip flexors get locked short from sitting and from repeated hip extension under load. When they do not release fully, your lower back takes the slack on every rep of every pulling and squatting movement. Sixty seconds per side, first thing after a heavy squat day.
Lat Insertion (Armpit and Side of the Back)
Lie on your side with the ball tucked into the soft tissue just below your armpit, where the lat attaches near the back of the shoulder. Reach your arm overhead slowly. That combination of pressure and movement is called pin-and-stretch, and it works significantly better than static compression alone for releasing the lats. Tight lats pull the shoulder into internal rotation and limit overhead range. If your pull-ups have been grinding or your clean catch feels restricted, give this spot two minutes.
Calves (Soleus and Deep Gastroc)
Sit on the floor with your legs extended. Place the ball under one calf, then cross the other leg on top to add pressure. Flex and point the foot slowly. The soleus is deeper than the gastroc and responds to compression better than stretching. If you run or jump, the calves accumulate a surprising amount of fatigue that stays hidden until your Achilles starts complaining. Two minutes per calf, with extra time on the area about halfway between the heel and the back of the knee where the soleus is thickest.
Suboccipitals (Base of the Skull)
Lie on your back and place one ball on each side of the base of your skull, where the neck muscles attach to the occiput. Let the weight of your head rest on the balls rather than lifting or pressing. Small yes-and-no head movements after 30 seconds will let the ball find the specific trigger points in the suboccipital group. This is often where tension headaches actually originate. If you have tried everything for a nagging headache and nothing has worked, there is a good chance the problem starts at the base of your skull rather than behind your eyes.
Adductors (Inner Thigh, All the Way Up)
Lie face down with the ball placed against the inner thigh, a few inches below the groin. Slowly move the knee out to the side to increase stretch tension while the ball applies compression. Work down the inner thigh in two or three positions. The adductors are one of the most neglected muscle groups in training and recovery alike. They limit squat depth and internal rotation, and they get almost no attention from standard stretching routines. A firm ball pressing into that tissue while the leg moves is one of the few techniques that actually reaches deep enough to matter.
What I Would Skip
The IT band. I know it is the first thing people try to roll out, and I understand why it hurts when you press on it. But the IT band is not a muscle. It does not have much contractile tissue to release, and aggressive ball work directly on the band tends to irritate it more than it helps. If your IT band is screaming, work the glutes (number two on this list) and the TFL (number six). Those are the tissues that pull the IT band tight. Fix those and the IT band calms down on its own. Direct compression on the band itself is mostly just pain for its own sake. For more detail on plantar-specific technique, see the full plantar fasciitis guide.
A foam roller spreads the load. A lacrosse ball focuses it. Those are different tools for different jobs. For the spots above, the ball wins every time.
Two balls, one bag pocket, ten problems solved. That is the whole pitch.
The Kieba set is two firm balls that hold their shape after daily use. At under nine dollars, they cost less than a single recovery shake. If you are working any of the ten spots above, this is where to start.
Amazon Check Today's Price on Amazon →